Friday, February 19, 2016

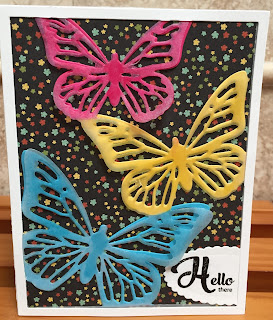
BRIGHT, SPRING-LIKE BIRTHDAY CARD


Have a peek at this happy butterfly  card, somehow butterflies always seem to make me smile, I guess cause they're just so pretty, hope you think these are too.

I used a new butterfly cover plate from Papertrey Ink, cutting it out four times, first in white CS, then in Melon Mambo, Daffodil Delight and finally in Blue Lagoon.  Oops forgot I also cut another one out of vellum.
  Separated each CS colored butterfly from their respective color and glued onto the background white CS. Then sponged each of the three colors onto one each of the vellum butterflies. Then glued the vellum pieces onto each of the three colors.
All of this was then adhered to a backdrop of Stampin' Up's Botanical Blooms DSP. I then cut another cover plate to get the white frame as I didn't like the way it looked with out it.  I just cut off the three butterflies and kept them for a future project.  Added a bit of sparkle using the Wink of Stella pens to the butterflies body.
As I don't have all my supplies with me, once again, I had to improvise and stamped the greeting on a small scalloped oval piece that had been trimmed down.

Sorry, I forgot to take a photo of the inside of the card as I was, as usual, in a rush to get it into the mail to a dear friend's birthday in MI.

I really like reading your comments and hope you come back again soon.
Hugs,
Nancy

Friday, February 12, 2016

PAPERTREY INK CHALLENGE


The-challenge
In honor of our 9th Anniversary, you are challenged to cut nine 1-1/2” squares from white cardstock, then alter all nine of the squares using a variety of techniques, colors, stamps, etc. Be sure to do something different to each square!  Cut lots of extra squares so you can experiment and have fun!  If you are running short on ideas you can always go through the Make It Monday archives.  Once you have completed them, adhere the nine squares to a 5-1/2” x 5-1/2” square card front and share their masterpiece on our InLinkz list below!

This is my 9 square techniques:


Starting with the upper left hand corner...utilizing washi tape to either cover or accent a card, next stamping an image onto printed designer paper, last in that row gradient coloring.

Second row, Two-toned stamping by Danielle Flanders Make it Monday, wet embossing a design, printing the same image onto varying sizes of cs.

ast row, dry embossing (kinda difficult to see), next to that watercoloring technique and lastly
introducing different colors using a cover plate border die.

That's it for now, love all the challenges and prizes by Papertrey Ink celebrating their 9th successful year in business!
Nancy

Monday, February 8, 2016

PAPERTREY INK CHALLENGE-9th ANNIVERSARY CELEBRATION


While sipping my morning cup of tea and peeking at PTI's "Create with Us" challenge, so many new and exciting things this month.  Anyhow while looking at Ashley Cannon Newell's posting showcasing the new Doodle stamps, I notice on one of her cards she stamped an all-over background using the Doodle butterfly then added a smaller sheet of vellum on top of her stamping.  I thought it was a very nice way to either highlight the stamping or a beautiful designer paper without stamping directly on the paper, sometimes the paper is so pretty it's a shame to stamp on it.  I will however try Ashley's idea of the all-over stamping too.

As I didn't have too much time, I opted to use one of Dawn McVey's printed papers from "Vintage Linen" topped it with a smaller piece of stamped vellum, added a few rhinestones to cover the adhesive and it was done.  I love the ease of the A-2 size printed paper it makes it so easy to quickly create a card.

Love all the challenges and opportunities PTI is offering as they generously include their customers in the celebration of their 9th successful year in business.  Woo hoo!


Thanks for checking out my blog, would love to hear from you.
Nancy

VALENTINE CARD


With Valentine's Day coming up soon I thought I better get a few cards that have to travel out of state, done!
Here's one of them... I saw it in a challenge and loved it, so it is totally CASEd  from a fellow blogger, Susan Goetter (SusanGoetter.blogspot.com), I'm thinking whatever challenge she entered  into she should win.

Susan created her card using a Silhouette cutting machine which I don't have, but I used a border punch die of hearts from PTI, cut several strips, adhering the # I needed for each line and added the sentiment.  Such an easy card and I think it's perfect, thanks Susan! It's a little difficult to capture the white-on-white hearts, but I think you can see most of them.


Here's a peek of the inside very simple, but to the point.


That's it for right now.
Nancy

Sunday, February 7, 2016

Yay, it's your birthday!


Hi there, just wanted to share a quick look at my latest birthday card.

It was an easy card to put together, my inspiration came from Pinterest (always a good source of so many things).
I used my recently acquired balloon punch which makes it so easy to punch out a number of balloons,  the dies for the balloon ties are difficult to see here but I think they add a realistic touch especially with the added gold bow.

The backdrop is an older embossing folder from Cuttlebug which I believe is still available and adds a festive look to the card.


Here is a picture of the inside of the card


That's it for today, would love to hear from you, won't you leave a comment I appreciate hearing from you.
Nancy