Sunday, December 20, 2015

CHRISTMAS TAGS


I know it's a busy week for everyone with the countdown on for Christmas, but wanted to share these photos of adorable Christmas tags I made inspired by Michelle Clark another Stampin' Up demonstrator.  They don't take long to assemble, so they're a good last minute project!

I used the cute little antlers from SU's "Wonderland" stamp set, pearls of different sizes which were colored with markers and added tiny red pom-poms for Rudolph's nose all suggested by Michelle.  Great idea Michele, thanks for sharing and inspiring!


Here's a side view showing the cute little pom-pom nose!


Also wanted to share a picture of my decorated fireplace mantel.  The idea for the bulb swag came from Pinterest of course, from Madeline Grace's blog I thought it was a great idea.

Here's a picture of all the bulbs strung together (had to make two strings as I didn't anticipate making the swag so long), eventually just tied them together.


Doesn't it look pretty?  Thanks Madeline for a great idea!


I love to read your comments, hope you leave one for me today.
Merry Christmas to all my fellow bloggers!
Nancy

Tuesday, December 1, 2015

The Paper Players Sketch # 273


This is a very versatile Tic Tac Toe Challenge from Sandy at The Paper Players, lots of fun options to use.

I think my card could qualify for either  a diagonal or a horizontal line item, what do you think?

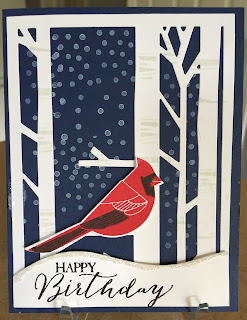
I couldn't help myself a few weeks ago when Papertrey Ink released their November stamp and die sets, this "Winter Woods" set just sang out to me.  It reminds me of winter days in MI when you could spot a beautiful cardinal in the white snow, just a lovely sight (even though there was snow).  My inspiration or should I say CAS came from Nichole Heady with just a few minor changes. I did use the SU newer embossing folder for the falling snow, but it doesn't show up in the photo.

I'm sending this card up North to a friend in MI who celebrates a December birthday, I'm thinking this card is perfect for him, snow or no snow, what do you think?

Here's a side shot showing the glittery snow on the snow bank.


That's it for today, I'd love to hear from you, won't you leave a comment
Thanks,
Nancy

Sunday, November 15, 2015

INSIDE OF CHRISTMAS CARDS PRINTED!


A while back I mentioned I had  someone who wanted a few  Christmas cards, but he wanted his own verse on the inside of the card as well as a reference to a Biblical quote on the other side.

I used my word processing software an 8 1/2" x 11" portrait layout.  After a few trial and errors I was able to figure out where the "quote" should be on the inside of the card (actually the back of the front of the card) as well as the sentiment he had chosen for the other side of the inside of the card.

I printed this twice on whisper white card stock, once near the top of the cs and again a little lower, Figure A.

                                                          Figure A

After printing the quantity I needed I scored the 8 1/2" x 11" cs in half at 4 1/4"
cut the sheet in half at 5 1/2" on the long side.  I then had the printed inside of the card so it was just a matter of adhering the front of the card and I was done.  Here is the inside of the finished card.


There is probably an easier way or some other software that would do all of the measurements for you, but I'm "old school" and figured it out on software I knew.

On another card I was making the person wanted their name printed on the inside under the verse so once again I went to my word processing, figured out (more trial and error) how to divide up the 8 1/2" x 11" landscape format sheet to the size I needed for the inside.
Here is the signature sheet after printing (figure B) sorry for the shadow on the photo).

                                                         Figure B

Again, after printing the quantity I needed I cut the printed sheet in half on the short side, again at 3 1/2" twice on the long side which gave me 6 inserts for the inside of my card.  I then stamped the sentiment they chose above their signature!  This is the inside of the finished card.


Yippie, skippie, I'm very happy how the cards turned out.

I'd love to hear what you think and any helpful tips you might be able to give.
Thanks for looking,
Nancy

WELCOME BABY GIRL


Baby cards are such  fun to make, here's mine for a newly born little girl.  The animals each have just a touch of glitter and a little bit of pink on their toes!


That's it for today, hope you like it.

Thanks for looking.

Nancy


Thursday, November 5, 2015

MORE CHRISTMAS TREAT BAGS (super easy-peasy)


Hi everyone,  another Christmas treat bag peak, I'm really crankin' these out for a client.
Super easy small kraft bags (from Hobby Lobby size 3.50" x 6.75", smaller than the lunch bag size) with a decorative tag and lovely sentiment for the holidays.  Tie on a couple of jingle bells with candy-cane twine and you're done!

My client is going to fill them with candy and treats for some of her co-workers as a small Christmas token and she wanted something simple, so simple it is!
The little bags are so cute, I bought extra to keep on hand, ya just never know.


Here's a picture of all 22 of them together, don't they look cute?


Told ya, easy-peasy, but oh so cute!

Why don't you take a minute and leave a comment,
Thanks,
Nancy

Wednesday, November 4, 2015

YUMMY BIRTHDAY CARD!

Who wouldn't want to get a yummy looking card like this, I know I would.  I'm sending it to CA to one of my nephew's little girls for her 11th birthday.

The sweet little cup cake die and stamps are from PTI, making it so very easy to whip up a card in a matter of minutes. Too bad I didn't have any glimmer for the cherry on top!

Here it is...

Won't you leave a comment as I do enjoy reading them.
Have a fabulous day.
Nancy

Tuesday, November 3, 2015

CHRISTMAS TREAT BAGS

Just finished making 15 (well actually 18) of these adorable treat bags for a client who ordered them to give to some of her co-workers.

I used my daughter's Mini Treat Bag Thinlits (as I didn't have it) to make the bags then stamped using Stampin' Up's "Come to Bethlehem".  I used the new Archival Basic Black ink, which I really like.  The star and the sentiment as you can see were stamped in gold ink.  I punched a double slit at the top and threaded the new gold cord into a little bow, all done!

Here's a picture of one of them, I'm very happy with how they turned out, what do you think?


Here's a picture of most of them together and one of the back.


That's it for today, should have a couple more ready for my client soon and will share them with you.

I'd love to hear from you, won't you leave a comment.
Nancy

Saturday, October 31, 2015

NEW LOOK!

Just had to share the look of this piece of furniture I painted.  It is a sideboard from a dining room set and I had grown tired or it as it looked...so I painted it with Annie Sloan's Chalk paint.  I love the end result and think it looks so much nicer, what do you think?
                                                                               Before
                                           After!

Monday, October 26, 2015

Christmas Treat bags

Here are a couple of the treat bags I'm making for a client, hope he likes 'em.
What do you think?


Both bags were made with Stampin' Up Mini Treat Bag Thinlits.  The snowflake is Bigz Snow Flurry from a few years back.  The manger scene is a PTI current set.

I'll be back tomorrow with a few more samples to view.
Thanks so much for looking,  I appreciate your comments and read each of them
Nancy

Sunday, October 25, 2015

CHRISTMAS CARDS!


I received a request to make a few religious Christmas cards for someone to purchase.  Here are a couple and some tags that I came up with.  Hopefully I'll be sharing a few more within the next day or two.

This first card is a pretty flat card easy to mail even though it has a few layers.
I first stamped the image, cut it out with a circle die, punched the stars at the top of the circle and added some shiny silver paper behind the stars for just a bit of glitz.


PAPERTREY INK BLOG HOP:


This second card is one of my fav's and for the PTI Blog Hop today, I thought it fit to using the traditional Christmas color of green with just a touch of red. I love the look of the old time Christmas song sheets to coordinate with a new sentiment from PTI.  Again an easy mail card with not too much bulk to it even with the added frame and sentiment shape.


So, what do you think, which do you like better?  I haven't shown them to my customer yet, but when I do I'll let you know their preference.

Oops almost forgot here are a couple of Christmas tags also.


Thanks for taking the time to look and maybe leave a comment.
Nancy

Friday, October 23, 2015

BABY BOY CARD!

How about I haven't needed a " baby" card in ages and now I have three in a row.  This one is very similar to my previous post except this one is for a little boy.

Love the idea of being able to just slide a gift card into that little shoppin' bag!


My daughter, Nance of Canopy Crafts and my friend Diane of Rubber 'n Rafters may remember this adorable little elephant. Almost five years ago we made a lot of book marks (here) and believe it or not I still had a few of the fuzzy animals left, better yet I could find them!

I'll have one more Baby card to post in a day or so and I think that'll be it for that type of card, at least for a while.

Here's a picture of the inside...


Now tuck it into a baby blue envelope and off it goes!

Thanks for looking and I hope you leave a comment, even a brief one.
Nancy


Friday, October 16, 2015

Baby shower gift card


A quick post to share a card I made for a baby shower back in MI, since I'm here in FL for the winter I obviously won't make it to the shower, so a gift card is the way to go.

Just look how adorable (if I do say so myself) this turned out.  I love the little shopping bag and the hand holding it, just perfect to slide a gift card into the shopping bag, and of course it had to be "girly" as the happy couple are expecting a little girl!


That's it for now.

Thanks for leaving a comment I do enjoy reading each of them.

Nancy

Tuesday, October 13, 2015

October birthday


One of the card swaps I received at WCMD in Atlanta was from Karen Ferguson.  How about this, we each traveled approximately five hours to get to the event and we live about 30 minutes from each other, she is in Williston, Florida, who knew!

I pretty much used all of her ideas, with the exception of the burlap banner and a different sentiment, but the inspiration all came from her, thank you Karen.

Here's my card which will be mailed to my sister-in-law who happens to have an October birthday and with Fall all around us, I thought this design was perfect, I hope she does too.


Here's the inside sentiment


Supplies:
Vintage Leaves stamp set, Woodland embossing folder, leaflets frames
Inks: Old Olive, Cajun Craze, Delightful Dijon, and Soft Suede

Would love to hear from you, thanks for looking.
Nancy

Friday, October 9, 2015

Acorn treat time!

Hi everyone,
Just a quick post to show the adorable "acorn" cookies I made again this year. We are heading out to a volleyball tournament tomorrow for my granddaughter so I'm sure the girls will need a little sugar fix at break time.


I love the little berries and leaves (all from the dollar store, love that place) which will be perfect table-scapes for a luncheon I'm co-sharing with a neighbor later in November.

Thanks for looking, hope to hear from you.
Nancy

WCMD-2015, Atlanta, Georgia


What a great weekend we had, my daughter Nance Lempinen Leedy of Canopy Crafts, and myself attended World Card Making Day in Atlanta, Georgia.

The WCMD was hosted by Brian King and Pam Morris and was a lot of fun.  We met old friends and made new ones (it's so nice to actually meet some of the women you know through their blogs) as well as participating in a card swap.  How could you not swap cards at WCMD, there were approximately 60-65 swaps! At the end of my post I'll show a sampling of some of the cards.
There were some great presentations, games, give-aways, stamp set gift, make- and-takes, lots of inspiration and an absolutely delicious lunch, complete with one of my all time fav's "Bread Pudding (bites) in a Rum sauce, oh my, true Southern hospitality!

Anyhow enough of that...this is the card I made and used as my swap. After a lot of h'mm's and don't know, this is what I (and my daughter) came up with.


I used two strips of Happy Haunting washi tape, cut one narrow strip of black glimmer paper to cover the seam.  The image was stamped on very vanilla CS and the leaves and pumpkins colored with SU markers.  The sentiment was also on vv CS and backed with another piece of black glimmer paper finished off with a very vintage button, courtesy of my daughters stash and a linen thread bow, which apparently didn't get on this card!!
My daughter's swap card was this adorable Flap Fold Card Tutorial she used on The Paper Players blog where she is a team member.  The picture doesn't show how cute it opens to reveal the inside.
As promised here are some of the wonderful card swaps we received.


A picture of our table at the event.


That's it for now, thanks for looking.  I'd love to hear from you, please leave a comment.
Nancy


Wednesday, July 29, 2015

PAPER PLAYERS #255 SKETCH


Here's a sketch from the Paper Players and this is my card for Sandy's sketch.

I used a die cover plate from Papertrey Ink and removed a column of the raindrops along the side to imitate a border as in the sketch.
The sentiment is stamped on a strip of the same watercolor paper and adhered to the blue card stock.


Well that's it for today, thanks for looking and maybe leaving a comment, I'd love to hear from you.
hugs,
Nancy 


Tuesday, July 28, 2015

RETRO and Belated birthday card!


Hi followers, just a quick post to show you a card that literally took FIVE minutes to make!


I used a pattern paper from Papertrey Ink (PTI), it's called "Vintage Linen" and it's adorable with so many familiar "old-time" images from greeting cards (if you're old enough to remember them).


The paper is just large enough to cover the front (or maybe the inside) of your card, stamp it and done.

Of course if you wanted there are dies to also coordinate with the floral images, but I was in a hurry to get the card in the mail before pick up.
Even the coordinating stamp sentiment has the vintage look.

Since I needed a belated card I did use a more current "belated" stamp on the front.  I think the inside sentiment is so nice, it is also from PTI and I just had to add one of the lined floral images inside to pick up on the front of the card.


Thanks for checking out my blog, would love to read your comments.
Hugs,
Nancy

Supplies:
Pattern paper and sentiment stamps from Papertrey Ink


Thursday, July 16, 2015

SECOND POST FOR TODAY!


This little card has been floating in my mind for a few days as I had die cut the sentiment a few days ago and didn't do anything with it, then I found a challenge for a CAS "Man" card, perfect I thought except now I cannot locate the challenge, oh well it did get me to use the die cut!

I adhered the die sentiment to a black piece of CS and then again onto a black and white designer paper, almost forgot the little stars which were part of a Christmas roping that made it's way onto my craft table, begging to be put to good use!

So that's it for now, hope you have a fabulous day!
Nancy


Supplies from
Papertrey Ink (PTI)

Wednesday, July 15, 2015

THANK YOU!

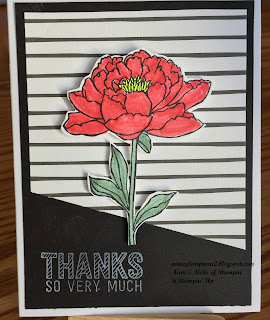
A very CAS card I needed today.
Used black/white striped designer paper cut on an angle at the bottom, adhered to a black CS, onto a white CS A-2 size base.

The flower was fussy-cut then colored with two of the new Stampin' Up "in" colors and popped up. Once again with limited supplies I had to color the center of the flower with yep, a neon highlighter pen!

That's it for now, thanks for looking!
Nancy


Supplies:
Stampin' Up sets,
You've Got This (image) and
Simply Wonderful (sentiment)
Designer striped paper from PTI

Friday, July 10, 2015

Paper Pumpkin

Just a quick post to show the adorable set you can create with the June Paper Pumpkin stamps and paper.

In case you don't know...
Paper Pumpkin kits come with everything you need, paper, ink, stamps, directions, thread, stickers,  even tissue paper with this set.
I'm using the bag and card soon for a friend who has a birthday this month.


Such bright and happy colors isn't it cute?

Thanks for looking today, I appreciate your comments.
Nancy

Saturday, July 4, 2015

HELLO MINNIE!

A fun card for a friend of mine who absolutely adores Mickey and Minnie, she has many items around her house including a Mickey doorbell and faux boxwood planter in the shape of the famous mouse alongside of her front door!

The inspiration for this card came from http://kthomdesigns.blogspot.com/ apparently she too has a friend who loves Disney items.

I changed it up a bit so it's not completely a CASED card.  I die cut three circles for the mouse, but the bow is the thing I like the best.  As I've said before I don't have all of my supplies here with me so I had to improvise.  The hair bow on Minnie is a die from a PTI set that has stamps, wine bottles, wine glasses, etc.  I used the bottom part of a wine glass die for the two pieces, and a small strip to fill in the middle.  I thought it turned out rather cute, don't you?


On the inside I continued a smattering of the gold water spots before stamping the sentiment.


That's it for today, thanks for looking and hope you leave a comment for me.
Nancy

Thursday, July 2, 2015

SYMPATHY CARD

So sad to need a card for a fellow golfer friend whose husband unexpectedly passed away.  Our thoughts and prayers are with her to help her and family through this very difficult time.

I wanted my card to be a simple design with few embellishments and the sketch at the paper players this week was perfect (also that it was a sketch designed by my talented daughter Nance Leedy made it even better).


I opted not for two separate pieces across the front of the card, but used my scallop punch twice and inverted one piece on top of the other, so in reality I guess there are two pieces!


 A glimpse at the inside...


All supplies from Stampin' Up
World of Dreams stamp 
Thoughts & Prayers 
Scallop border punch
Very Vanilla & black cardstock
Gold and black inks


Thanks for stopping by and please leave a comment. I love to hear what you think.
Hope your day is FABULOUS!
Nancy